Workspace Context Menus • Windows OS
Access in GroBoto: Right-Click on Background or Object
The text below is shown in the Notes Column on the right when you roll over the image (so you can view the image and read the relevant text at the same time).
We include the full text below for reference and search.
Scene Context
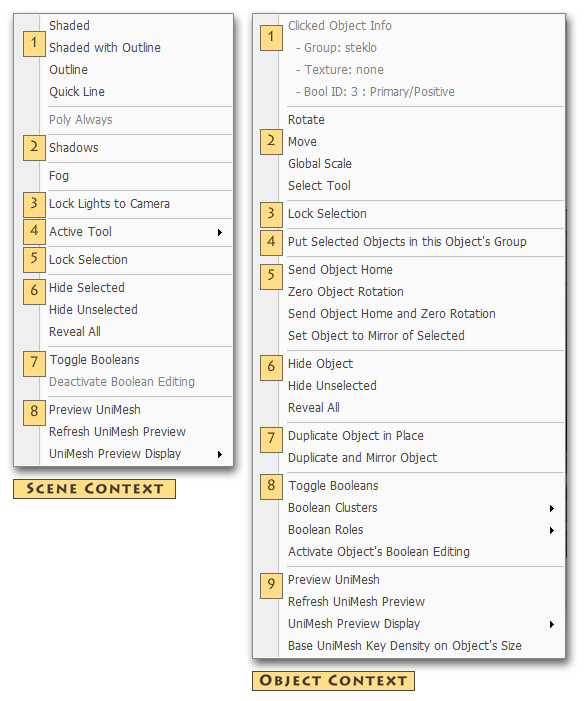
Right Clicking on the Background in GroBoto's Workspace brings up this menu.
1. Render ModesFour GroBoto Render modes, plus special 'Poly Always' mode:
Shaded - Full rendering with Shadows (if on), and Textures (if present). May be used for editing and rendering to file. Performance: 2nd Slowest after Shaded w/Outline.
Shaded w/Outline - Full rendering with Shadows (if on), and Textures (if present), plus Outlines describing all edges. Outline width and color are editable. May be used for editing and rendering to file. Performance: Slowest.
Outline - Flat colors and Outlines. No Shadows or Textures. Outline width and flat colors are editable. May be used for editing and rendering to file. Performance: Faster than Shaded modes - but not dramatically.
QuickLIne - Monochrome outlines. No antialiasing. No Shadows or Textures. Default adaptive high-speed mode when Custom Booleans are on. Custom Booleans can not be rendered with standard OpenGL (see Poly Always below). Performance: Fastest after Polygonal/OpenGL.
Poly Always - Crude OpenGL polygons - designed for speed only. Default adaptive high-speed mode (activated when moving the Camera for example). As noted above, this mode is not available with Custom Booleans.
2. Shadows & Fog
Toggle Shadows & Fog On/Off. Full settings for these features are found in GroBoto's Right-Side Panels - Scene Options Tab.
3. Lock Lights to Camera
Locks/Unlocks Lights and Camera. When locked, the lighting of your Model does not change as you rotate the Camera. This is the preferred mode for modeling as all views get equal illumination.
Notes: You will need to Unlock the Lights in order to see or manipulate their Widgets (in order to change their direction or location).
4. Active Tool
This item's submenu allows an alternate method of selecting object editing tools (Move, Rotate, Reshape), rather that selecting them in the Edit Panel.
5. Lock Selection
Lock/Unlock current Object Selection.
Locked Selections play an essential role with many of GroBoto's Workspace Editing Tools (See the Modeling Videos for details.). GroBoto handles locking automatically for the most part — you should not need to toggle Selection Lock manually.
6. Hide/Reveal Objects
Hide any selected Objects, or Reveal all hidden Objects.
Hidden objects can not be selected (with the exception of Boolean Trim Objects which show as wireframes when their Boolean Cluster editing is activated).
Hidden objects are not included in SeamNet Mesh generation.
Note:
Boolean Trim objects always remain hidden when Boolean Display is on (see Boolean Modeling pages and the Toggle Booleans menu item described below).
7. Toggle Booleans
Toggles Custom Booleans Display On/Off. When on, the result of all Boolean Clusters are shown (the shape formed by the effects of a Clusters Trim Objects on its Primaries).
When Off, all Boolean Cluster Primaries and Trims show as normal GroBoto primitives. That may result in a confusing looking model especially when many and/or large Trim Objects are included in the Cluster, but can useful when designing certain complex structures.
8. Mesh Preview
These three items allow you to preview your mesh in the workspace prior to exporting.
Preview UniMesh - Switches Mesh Previews on/off (it triggers the mesh generation when switched on).
Refresh UniMesh Preview - Updates the mesh (after you change settings, like Density).
UniMesh Preview Display - Offers several flavors of the OpenGL mesh display (works instantly - does not trigger mesh generation).
These same functions are available in the
Output Panel.
Object Context
Right Clicking on any Object in GroBoto's Workspace brings up this menu.
1. Object Info
Some useful information about the clicked GroBoto Model:
Group - GroBoto Group to which the Object belongs.
Texture - Texture (if any) assigned to the Object.
BoolID & Role - BoolID (Cluster identifier), and Boolean Role assigned to this Object - useful for identifying Cluster elements as you create and edit them.
2. Edit Tool Selector
This item's submenu allows an alternate method of selecting object editing tools (Move, Rotate, Reshape), rather that selecting them in the Edit Panel.
3. Lock Selection
Locks the current selection — meaning that edits performed in the Workspace (Move, Rotate, Reshape), will act ion that locked selection and will not change the selection (no matter what object is clicked). This is an essential behavior for Groboto's 'referential' editing (ex. edit tool options that use the clicked object's coordinate system for Move or Rotate).
4. Object Grouping Options
Assigned all Selected Objects to the Clicked Object’s Group -- An easy way to add objects to a Group without having to go to the Selections & Groups Panel.
5. Relocation/Orientation Options
Send Home - Moves the object to the center (0, 0, 0) of GroBoto's World. Nothing else about the object is changed.
Zero Rotation - Rotates the Object to its standard orientation (Y-Axis of object pointing up - ex, a cylinder sits on its base like a can).
Send Home & Zero Rotation - Moves the object to the center (0, 0, 0) of GroBoto's World and rotates the Object to its standard orientation (see Zero Rotation just above).
Set Object to Mirror of Selected - Use: Select one Object, then right click on another. The Clicked Object is moved and oriented, becoming an X-Mirrored version of the Selected Object. It the two Objects are of the same primitive type (both ellipsoids, cones, cylinders, etc.), the clicked object inherits the shape parameters as well (length, radius, etc.).
6. Hide Options
Hide Object(s) - Hide Clicked object. If there is a selection, you have the option of hiding just the Clicked, or all selected, objects.
7. Duplicate OptionsTwo ways to create copies of Objects in your model.
Duplicate in Place - creates a duplicate in the same location as the original. The duplicate is automatically selected so it's a good idea to move or reshape it right away.
Duplicate & Mirror - creates a duplicate in the X-Mirrored location as the original. The duplicate is automatically selected.
8. Boolean Options
Boolean Clusters - SubMenu with options for creating new Clusters or adding primitives to existing Clusters.
Boolean Roles - SubMenu for assigning Boolean 'Roles' for Cluster Primitives (the role they play in the Boolean Cluster ex. Primary/Positive, or one of several Trim types).
Activate Object's Booleans Editing - Displays all of the Cluster's Trim Primitives as selectable, editable wireframes. Only one Cluster can be activated for editing at any time.
9. Mesh Options - These items are available when the clicked object belongs to a Bot.
These three items allow you to preview your mesh in the workspace prior to exporting.
Preview UniMesh - Switches Mesh Previews on/off (it triggers the mesh generation when switched on).
Refresh UniMesh Preview - Updates the mesh (after you change settings, like Density).
UniMesh Preview Display - Offers several flavors of the OpenGL mesh display (works instantly - does not trigger mesh generation).
These same functions are available in the
Output Panel.
Base UniMesh Key Density... Convenient way to set SeamNet Mesh Density Key based on a single object (without having to select it first). It duplicates the button in the Output Panel.