Photoshop, Final Cut, Motion, After Effects, ZBrush (including ZBrush ‘Z’ logo), Cinema 4D, Bryce, Maya, 3DS Max, Vue, Carrara, Lightwave are Trademarks and/or Registered Trademarks of their respective companies and/or publishers.


Prev - Next
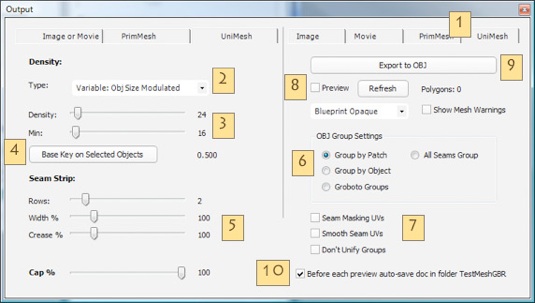
1. Mesh Type
These Tabs switch between our two Mesh options.
PrimMesh - Old per-object method.
UniMesh - New Unified SeamNet Mesh... all of the visible primitives in your scene are melded into a single ‘shell’ mesh.
The new SeamNet mesh is, of course, the focus of this beta. The Primitive Elements method is covered in your version 2 docs.
2 & 3. Density Settings
These control overall density/quad-size of your mesh. The values are based on divisions around the circumference of GroBoto Primitives. They relate directly to circumferential divisions of objects like Cylinders, Cones, etc. For other objects the result is similar (ex. a box will have about the same number of divisions around it’s girth - ‘tho it may vary a bit depending on the box proportions.)
The Type Pop-Up has three options:
Fixed Circumference - Every Primitive gets the exact number of divisions requested. This results in much larger (absolute size), quads for large objects, smaller for small objects.
Variable: Obj Size Modulated - Objects that are the size of the Key Object (see below), get the requested number of divisions. Larger objects get more, smaller objects get fewer. This adjustment is ‘weaker’ than the ‘Proportional’ method below... still considerable variation of absolute quad sizes.
Variable: Obj Size Proportional - Objects that are the size of the Key Object (see below), get the requested number of divisions. Larger objects get more, smaller objects get fewer. This adjustment is much ‘stronger’ than the ‘Modulated’ method above, resulting in quads of roughly the same size throughout the model.
4. Base Key on Selected Object - For either ‘Variable’ method above, you need to indicate a Key Object... an object whose size is the basis for quad divisions. Select an object and press this button to set the Key value. If more than one object is selected, an average of their sizes will be used.
5. Seam & Cap Settings
The Seam sliders control the characteristics of special quads along the seam. See Seam Notes .
The Cap slider Determines where the transition occurs between the Cylindrical Grid and the Square Cap Grid. See Cap Notes .
Note that you can also override Cap settings for individual objects in the ‘Selection & Groups’ Panel.
Previewing your Mesh - Mesh Previews are Modal - you can not edit your GroBoto Scene while the mesh is displayed in the workspace. Camera and lighting changes are allowed, but most other actions will cause GroBoto to automatically exit the Mesh Preview.
8. Preview, Refresh & Preview Type
These two Buttons and one Pop-Up allow you to preview your mesh in the workspace prior to exporting. The Preview checkbox switches Mesh Previews on/off (it triggers the mesh generation when switched on). Refresh is used to update the mesh (after you change settings, like Density). The Pop-Up offers several flavors of the OpenGL mesh display (works instantly - does not trigger mesh generation).
These same functions are available in the Scene Context Menu.
9. Export OBJ
Opens the standard file selector, generates the mesh and writes it to file.
10. Auto Save Temp files
When checked, a copy of your current scene is saved to a special folder just prior to any Mesh Preview. Please see the Intro Page (General Release Notes section) for more information.
SeamNet Mesh Tips & Notes
Modeling - We are working towards a fully robust system. We are having success with very complex models, but not every model. We encourage you to try modest models at first. We do not recommend attempting to generate meshes with Bot-Generated models containing thousands of primitives. It’s fine to use Bots to generate models (or parts of models) you intend to mesh - just avoid getting carried away.
Density - The best meshes are achieved with moderate-to-high variable density. A good starting point is to use a smallish object as your Key (not the smallest, but smaller than average), and set the density sliders to about 40 and 20.
Note that you can also override density for individual objects in the ‘Selection & Groups’ Panel.
If you are a digital sculptor (Zbrush, MudBox Modo, etc.), you may be tempted to create very low density meshes. You will find that this is neither necessary or practical with GroBoto Models. The ability to better define the core topology here in GroBoto, and to intelligently select and mask in your sculpting app replaces the need for ultra-low densities.
If you are accustomed to cranking up density with other unified mesh systems, you’ll find that you get more with less here. We generate verts optimally based on our knowledge of the true geometry and topology... not need to overwhelm inaccuracies with extreme density.
6. Object Grouping
The structure of our SeamNet Mesh offers logical components that can be exported as OBJ groups.
Thinking of the complete unified SeamNet mesh as a network of seams and surfaces helps in understanding its components.
Seams are generated by intersections between primitives (ex. two spheres that overlap create a circular seam at their intersection)... or by the components of primitives (ex. there are seams between the side wall and caps of a Cylinder).
The smallest component is a patch. A patch is any part of a surface enclosed by a loop of seams.
This release supports three OBJ grouping options:
Group by Patch - Every patch is placed in a unique group. Keep in mind that a single object may contain several patches (a cylinder has 3 - sidewall, and two caps)... and that those primitive elements may be further divided into smaller patches as when primitives intersect one another.
Group by Object - All of the patches of any GroBoto primitive are grouped together... even if those patches are disconnected as the result of intersection (ex. a long, thin cylinder passing through the center of a sphere - it’s disconnected ends will be in the same group).
GroBoto Groups - OBJ grouping based on GroBoto’s own named groups... allowing multiple objects to be converted to a single OBJ Group.
All Seams Group - Divides entire mesh into just two groups: All quads that run along the seams, and everything else. This can be valuable for converting seams into ridges or channels in the destination app. However you should consider using the Seam Masking UV’s option (see below).
7. Seam Masking UVs / Smooth UVs - Assigns UV coordinates to all of the seam quads. Many applications (like ZBrush) can mask polys based on texture values. The advantage of this method is that it can be combined with the other OBJ grouping options listed above, giving you multiple selection/masking options in the destination app.
7. Don’t Unify Groups - This option divides your OBJ into separate meshes for each GroBoto Group. Use this option when you don’t want your entire model melded into a single mesh. For example, you may want to keep a robots arms separate from its body even though they overlap.
This is valuable because having a single OBJ (even ‘tho the meshes are separate), simplifies both export things and import (as opposed to manually generating and saving multiple OBJ files.
There are some important considerations when using this option... see the notes on the new SeamNet Mesh page.
Mesh Export Interface
The Export Panel contains all of the SeamNet Mesh settings. These are global settings for all objects in your scene. GroBoto has two adaptive methods that usually provide a good distribution of mesh density throughout the model.
Note: You can override density settings for individual primitives. using the ‘Unimesh Export Overrides’ sliders found in the Selections & Groups tab of GroBoto’s right-side panels. If the ‘Density’ or ‘Hi Cap’ boxes are checked in that panel, they will override the corresponding global settings..
Windows page
Click to switch to Mac


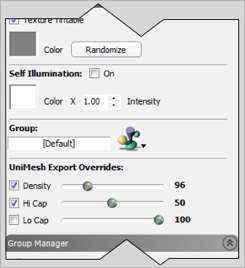
Individual Primitive Overrides
Selections & Groups Tab